How to Outline a Book A Writer's Guide

Before you write a single chapter, you need a blueprint. That’s what a book outline is: a structural plan you create before you dive into the manuscript. It’s where you organize your plot points, map out your character arcs, and connect your themes into a logical sequence, giving your story a clear direction from the get-go.
Why a Solid Book Outline Is Your Best Friend
Have you ever tried to wing it on a big project? Jumping into a manuscript without a plan is a lot like that—it’s like setting off on a cross-country road trip without a map. Sure, you know your destination, but you’re almost guaranteed to hit dead ends, take wrong turns, and waste a ton of time and energy.
Think of your outline as your story’s GPS. It guides you through the complex terrain of your own narrative, making sure you actually arrive where you intended. It’s the architectural plan that keeps the whole structure from collapsing. With a good outline, you can avoid those dreaded mid-book slumps, gaping plot holes, and characters who just meander aimlessly.
The Power of a Plan
There's a persistent myth that outlining kills creativity. I’ve found the exact opposite to be true. A solid book outline doesn't just provide structure; it actually frees you up and helps you figure out how to boost creativity. When you get all the logical heavy lifting done upfront, you liberate your creative mind to focus on what really brings a story to life: the compelling prose, the vivid descriptions, and the characters that feel real.
I once worked with a fantasy author who was completely drowning in the intricate world she’d built. She had incredible magic systems and a fascinating cast of characters, but her plot was all over the place. Her story felt like an endless, sprawling mess. It wasn't until she took a step back to create a detailed outline that the core narrative finally clicked into place, giving her the clarity she needed to push forward.
An outline doesn’t chain you to a rigid path; it gives you the freedom to explore your story’s side roads with the confidence that you’ll always find your way back to the main highway.
This isn’t just anecdotal, either. The results speak for themselves. According to a recent survey of self-published authors, a whopping 65% said that having a detailed outline was a major factor in finishing their manuscripts on time. Compare that to just 30% of authors who wrote without one. Planning clearly makes a difference. You can see more on book market trends on straitsresearch.com.
Benefits of Outlining Your Book
Ultimately, learning how to outline a book is one of the best investments of your time. It pays off again and again through the writing and editing phases.
- Clarity and Direction: You always know what needs to happen next. This is your single best weapon against writer's block.
- Structural Integrity: An outline helps you spot and fix plot holes or pacing problems before you’ve written 50,000 words around them.
- Improved Pacing: You can deliberately map out the story's rhythm—the build-up of tension and the moments of release—to keep readers hooked.
- Efficient Writing: With a clear roadmap, you’ll write faster and with more confidence. That means fewer painful, extensive rewrites down the line.
Think of this guide as the high-level map for your outlining journey. Let’s get you familiar with the destination before we hit the road.
Finding Your Story's North Star
Every book starts with that initial spark—a compelling character, a gripping situation, a world you can't stop thinking about. But an idea, no matter how brilliant, isn't a story. Not yet. To get there, you need to turn that flicker into a guiding light, a "North Star" that will keep you on track through the long journey of writing.
This isn't just about figuring out what happens next. It's about uncovering the purpose of your story.
Start by playing with "what if" scenarios. This is where the magic really begins. What if a down-on-her-luck chef inherits a restaurant, only to find it's a front for a magical black market? That single question gives you a protagonist, a setting, a central conflict, and a ton of genre potential right off the bat.
Distilling Your Core Idea
With a solid premise in hand, it's time to dig a little deeper for the theme. What’s the big question your story is trying to answer? For our chef, maybe the theme is about choosing between ambition and integrity. This theme will become the emotional engine of your story, influencing her choices and shaping the challenges she faces.
This is the perfect time for some free-form brainstorming. I'm a big fan of mind mapping. Stick your main idea in the center of a page and just go wild, branching out with every related thought—characters, subplots, cool magical ingredients, potential villains. The key is not to filter yourself. This visual dump often reveals surprising connections between your plot and theme.
The image below shows how your book’s purpose (what you want to say) and its genre (how you package it for readers) come together to create that core idea.
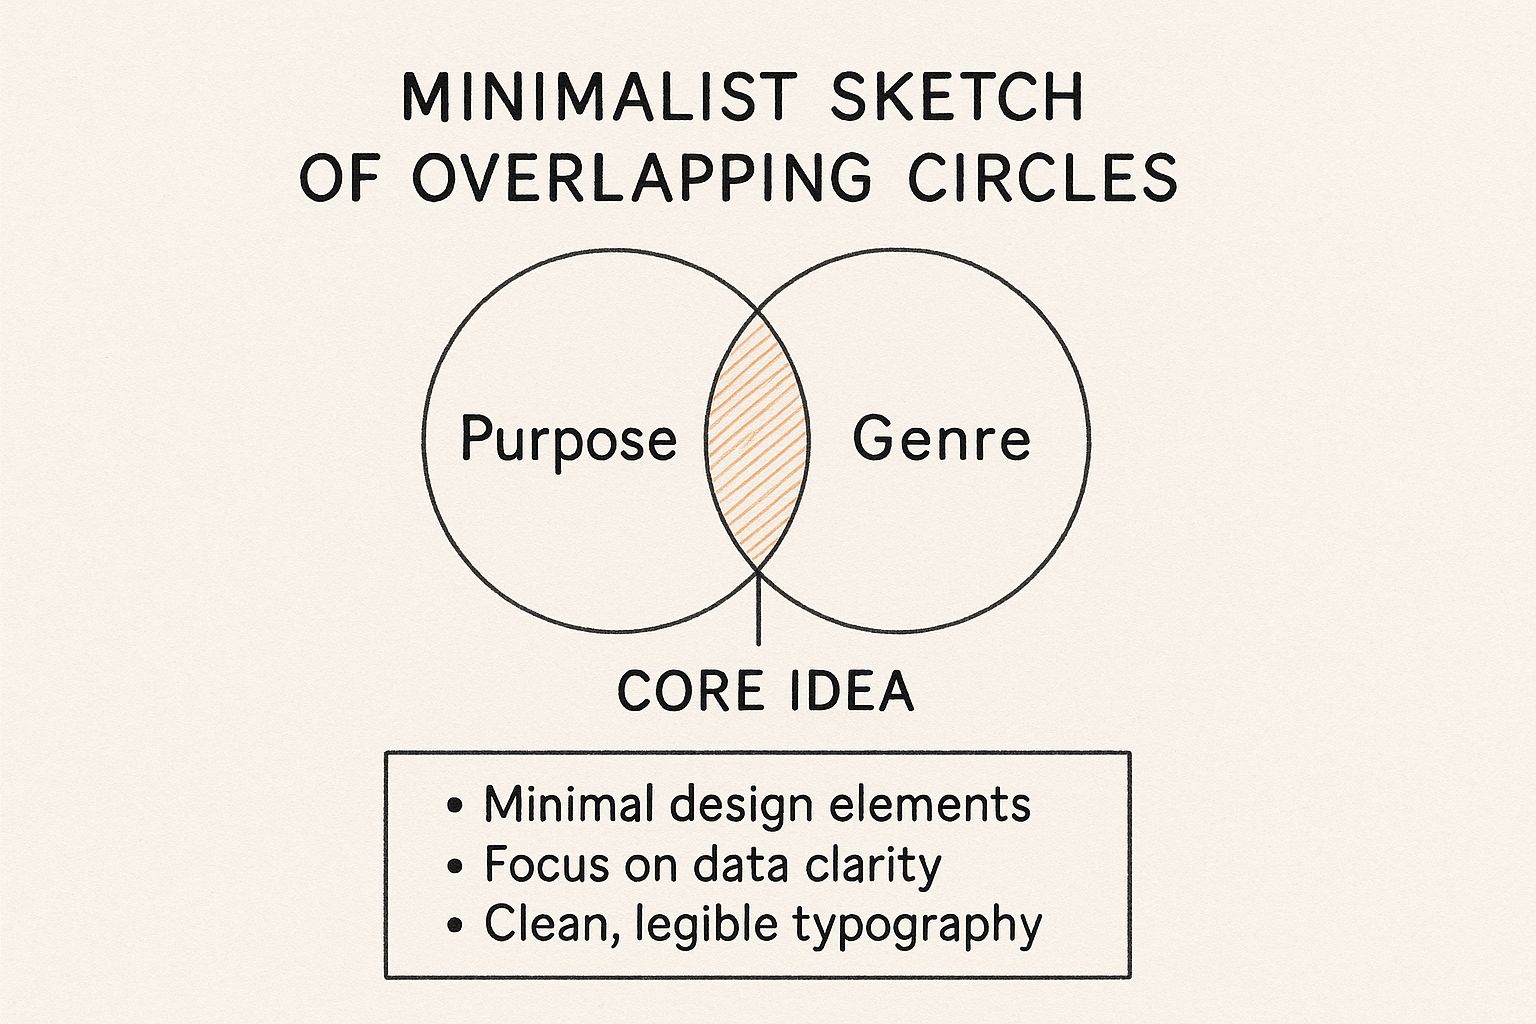
When these two elements align, you hit the sweet spot. You've got a story with depth that also meets the expectations of your target audience.
From Big Idea to One-Paragraph Synopsis
Now for a real test of clarity: boil it all down into a single paragraph. This isn't the back-cover copy you'll use for marketing; this is a private tool just for you. It needs to nail down the protagonist, what they want, the main obstacle in their way, and what’s at stake if they don't succeed.
Writing a one-paragraph synopsis forces you to make crucial decisions about your story’s most important elements. It’s the ultimate clarity check before you dive into the detailed work of building your outline.
Subscribe & Get Your Free Marketing Plan Template
Receive regular updates on marketing best-practices, AI shortcuts, and get our proven 4-phase marketing roadmap for free.
Unsubscribe anytime.
Taking the time for this kind of structured planning really pays off. It's not just a creative exercise. Data from publishing reports shows a clear link between a solid outline and success. In fact, North American authors who use these kinds of pre-writing techniques see 40% higher engagement from traditional publishing channels. You can learn more about trends in the book market if you're interested in the numbers.
Comparing Popular Outlining Methods
Before you start laying down scene-by-scene details, you need to choose an approach. Different outlining methods work for different writers and different types of stories. There’s no single “right” way, so it’s worth understanding the most common techniques to see which one resonates with you.
The table below breaks down three popular methods, giving you a quick look at what they're best for and how they function.
| Method | Best For | Key Characteristic | Example Use Case |
|---|---|---|---|
| The Snowflake Method | Writers who like to start small and build outward, adding layers of complexity. | Starts with a one-sentence summary, then expands to a paragraph, character synopses, and a full scene list. | Perfect for a complex epic fantasy with multiple intersecting plotlines and a large cast of characters. |
| The Three-Act Structure | Plot-driven writers who want a classic, time-tested narrative arc. | Divides the story into three distinct parts: Setup, Confrontation, and Resolution, with clear turning points. | Ideal for a fast-paced thriller where pacing and major plot twists are critical to the reader's experience. |
| The Book-in-a-Month (BIAM) Method | Writers who are highly visual and prefer a flexible, non-linear approach. | Uses index cards or digital equivalents to map out individual scenes, which can be easily rearranged. | Great for a character-driven literary novel where the emotional journey is more important than a rigid plot. |
Think of these as frameworks, not cages. You can mix and match elements to create a hybrid system that works for your unique process. The goal is to find a structure that frees you up to be creative, not one that stifles you.
Identifying Your Major Story Milestones
Finally, no matter which method you choose, you need to identify the big, unmovable pillars of your story. These are the major turning points that will anchor your narrative and drive the momentum forward.
- The Inciting Incident: This is the moment everything changes. It's the event that yanks your protagonist out of their normal life and into the story. For our chef, it's the letter informing her she's inherited the strange restaurant.
- The Midpoint Twist: A game-changing revelation smack in the middle of the book. It should raise the stakes and force the hero to re-evaluate everything. Maybe she discovers her parents were secretly powerful figures in this magical world.
- The Climactic Showdown: The big confrontation where the protagonist faces the core conflict head-on. Our chef has to fight off a rival who wants to seize the restaurant for their own dark purposes.
- The Resolution: The story's aftermath. It shows us the new status quo and ties up the most important emotional threads, giving the reader a sense of closure.
Once you have these foundational pieces in place, you're no longer staring at a blank page with a vague idea. You have a real map. You have your North Star. Now, the real work of outlining can begin.
Choosing the Right Outlining Method for You

Let's get one thing straight: there’s no secret password to the perfect book outline. Every writer’s brain is wired differently. The real goal isn't to find the "best" method, but the one that feels most natural for you and the story you’re trying to tell. You need a system that sparks creativity, not one that feels like a straitjacket.
For some authors, the process is intensely structured. For others, it’s more of a messy, visual exploration. We'll walk through four popular approaches here to help you find the outlining style that will become your trusted co-pilot.
The Snowflake Method for Planners
If you're the kind of person who loves starting with a single, elegant idea and watching it expand, the Snowflake Method will feel like coming home. It’s a systematic approach that builds your story layer by layer, ensuring every piece fits together.
You kick things off with a single sentence that sums up your entire novel. From there, you expand that sentence into a full paragraph. Next comes character summaries, and before you know it, you have a detailed scene-by-scene list. This method is an absolute lifesaver for complex stories with multiple subplots because it forces you to tie everything back to that core concept right from the start.
The Synopsis Outline for Destination-Focused Writers
Does the thought of starting a story without knowing exactly where it’s going give you anxiety? If so, the Synopsis Outline is for you. This approach is all about getting the big picture clear before you sweat the small stuff. You write a detailed summary of your entire book—usually between one and five pages—before you even think about chapter one.
Having that bird's-eye view lets you work out major plot twists, nail down character arcs, and weave in your thematic threads well in advance. It’s like having a detailed road map for your entire journey before you even get in the car. It ensures your narrative has a strong, logical throughline from the first page to the last.
The Mind Map for Visual Thinkers
Here’s the thing: not all stories unfold in a straight line, and not all writers think that way either. If your ideas feel more like a web of interconnected thoughts than a neat list, you should absolutely give the Mind Map a try.
Just grab a blank page and put your central theme or main conflict right in the middle. From there, you just let your brain go. Branch out with anything that comes to mind: character names, plot points, settings, snippets of dialogue, or thematic symbols. This non-linear method is brilliant for brainstorming and helps you discover unexpected connections you might have missed with a more rigid structure.
A mind map doesn't care about chronological order. It prioritizes creative connection, giving you a powerful visual blueprint of your story's DNA before you start worrying about chapter breaks.
Each of these approaches offers a unique way into your story. If you want to see how different structures play out in the real world, exploring some essential story outline examples can be incredibly helpful.
The Chapter-by-Chapter Method for Non-Fiction
While the other methods can work for any genre, the Chapter-by-Chapter Outline is the undisputed champion for non-fiction authors. It’s a classic for a reason. This is a straightforward approach where you create a bulleted list of the core topics or arguments for each chapter.
It might look something like this:
- Chapter 1: Introduce the core problem and make a promise to the reader.
- Chapter 2: Provide the historical context or background needed to understand the problem.
- Chapter 3: Present your primary argument and back it up with key evidence.
This method forces a logical progression of ideas, making it incredibly easy for your readers to follow along. It’s the ultimate tool for organizing information clearly and persuasively, guaranteeing that every single section of your book serves a distinct purpose.
Building Your Outline From Milestones to Moments
You've got the structural pillars of your story in place. Now it’s time to zoom in from the big picture to the individual bricks. This is the fun part, where you start transforming those major milestones into a living, breathing sequence of scenes and chapters.
The goal here is to fill the space between your key plot points with moments that have a real purpose. They need to drive the story forward.
Think of each scene as having a specific job to do. It’s not just about what happens next chronologically; it's about what each moment accomplishes. Does it push the plot? Reveal a crucial piece of backstory? Or maybe just dial up the suspense?
Assigning a Goal to Every Scene
Let's stick with our contemporary romance example. One of your major milestones is the classic "meet-cute" between Chloe, the baker, and Liam, the stoic architect. Simply writing "Chapter 3: Chloe and Liam meet" on your outline is a start, but it’s not enough. We need to break that down.
How can we turn that single event into a series of purposeful scenes?
- Scene 1 Goal: Establish Chloe's financial stress. We can show her at a farmer's market, anxiously watching as hardly anyone stops by her struggling bakery's stall. This scene’s job is clear: introduce her primary motivation of saving the family business.
- Scene 2 Goal: Introduce Liam’s personality. While rushing to a meeting, he could accidentally knock over her entire pastry display. This instantly shows us his preoccupied, slightly aloof nature without having to say a word.
- Scene 3 Goal: Create that initial spark. Instead of getting mad, Chloe’s wit takes over, and she defuses the whole situation with a joke. This catches Liam completely off guard. The goal is to establish their unique chemistry and the dynamic that will define their budding relationship.
See how each of those little moments now carries its own weight? We’ve just transformed a single plot point into a multi-layered interaction that gets several narrative jobs done all at once.
Every single scene you write must answer the question: "Why does this moment need to be in my book?" If it doesn't advance the plot, deepen a character, or build atmosphere, it might be a candidate for the cutting room floor.
Weaving in Subplots and Character Arcs
As you build out these individual scenes, you'll naturally start to see where the smaller stories—the subplots—fit in. Subplots are what add real richness and complexity to your narrative, making the world feel so much more real. For Chloe and Liam, a great subplot might involve Chloe’s ongoing rivalry with a corporate chain bakery that’s trying to buy her out.
This is also the perfect time to start mapping out the emotional arc for your characters. An emotional arc tracks how a character’s internal world changes throughout the story. Liam might start out as emotionally closed-off because of a past betrayal. But scene by scene, his interactions with Chloe slowly start to chip away at his defenses. You can—and should—make little notes about these shifts right in your outline.
Finding the Right Tools for the Job
Let's be honest, a detailed outline can get messy fast. Thankfully, you don't have to rely on a single, sprawling document that becomes impossible to navigate. Plenty of writers I know use simple, effective tools to visualize and organize their story.
Here are a few popular choices:
- Scrivener: This software is a true powerhouse for authors. It lets you create a virtual corkboard with digital index cards for every scene, making it incredibly easy to drag and drop scenes to experiment with pacing and structure.
- Trello or Asana: Believe it or not, these project management tools are fantastic for outlining. You can create a board for your book, lists for each act, and then cards for each chapter or scene. Each card can hold notes, checklists, and character details.
- Spreadsheets: For those of us who love a good grid, a simple spreadsheet in Excel or Google Sheets can work wonders. Just create columns for chapter number, scene summary, POV character, setting, and notes on the emotional arc.
Software tools like Dabble, Manuskript, and other Scrivener alternatives offer built-in outlining features that make this process even easier, with many providing free options to get started.
Ultimately, choosing the right tool is less important than building a consistent habit of using it. The main idea is to create a flexible, visual map of your book that you can easily update as new ideas strike. To really nail down your process, it helps to adopt strategies from an efficient content creation workflow.
How to Stress-Test and Refine Your Outline
Don’t treat your outline like it’s set in stone. The best outlines are living documents, a flexible blueprint for your story’s skeleton. The real work—and where the magic happens—is when you start to pressure-test it, deliberately looking for weak spots before you sink hundreds of hours into writing the manuscript.
This is the part of the process that separates a decent plan from a truly solid one. Your job now is to try and break your own story. Find the plot holes, the flimsy character motivations, and the sagging middle.
Start by reading your outline from beginning to end. But this time, you’re not the proud creator. You’re your own harshest critic.
Questioning Every Plot Point
The first step is to interrogate your plot relentlessly. Go through your scene list and challenge every single decision. Be merciless.
- Is that motivation believable? Does your character’s reaction feel earned and true to who they are? Or are they just a puppet of the plot?
- How’s the pacing here? Does the energy dip? Could these three plodding scenes be condensed into one powerful, punchy moment?
- Are the stakes really rising? Does each conflict genuinely raise the stakes and make things more personal for the hero, or does the tension just level off?
It can feel a little brutal to tear apart your own work like this, but trust me, it’s a lifesaver. Finding a weak character motivation in an outline takes a few minutes to fix. Finding it after you’ve written 30,000 words can stop a project dead in its tracks.
Stress-testing your outline isn't about nitpicking. It’s a targeted form of self-criticism that forces every scene, every character choice, and every plot twist to justify its existence.
The Reverse Outline Technique
One of my favorite tools for this job is the reverse outline. Most writers use this after writing a first draft, but it’s incredibly powerful at this stage, too.
Here’s how it works: put your detailed outline away. On a fresh sheet of paper (or a new doc), write down the main story beats from memory. What are the absolute most critical moments that form the spine of your story?
This exercise cuts through all the noise. If a plot point you thought was "major" in your detailed outline doesn't even make it into this bare-bones version, you have to question its importance. Is it really essential? This is a fantastic way to check your core structure and ensure the foundation is solid.
Plus, getting this clarity early on doesn't just help the writing; it's a huge benefit for your eventual marketing. For some early ideas on how a strong structure helps later, check out this guide on book marketing for self-published authors demystified.
Common Questions About Outlining a Book
Even with the best plan in hand, questions are going to pop up as you get into the weeds of outlining. It’s all part of the process. Let’s walk through a few of the most common hurdles authors face so you can keep moving forward with confidence.
How Detailed Should My Book Outline Be?
Honestly, there’s no magic formula here. The right level of detail is whatever helps you write without boxing you in.
For some authors, a single, punchy sentence for each scene is all they need. If you figure a standard novel has around 60-90 scenes, that gives you a solid, one-page roadmap to follow. It provides direction without killing the discovery process.
Other writers feel more secure with a hyper-detailed, multi-page outline that maps out every single story beat. They need to know the destination and every turn along the way. Your job is to find what works for you.
An effective outline is one you'll actually use. If it’s too vague, you’ll get lost. If it’s too rigid, you might feel suffocated. Experiment until you find what feels right.
What if My Story Changes as I Write?
Great! That’s usually a good sign. It means your characters are becoming real enough to have their own ideas about where the story should go. Your outline is a living document, not a contract set in stone.
When a more compelling plot twist or a more authentic character choice reveals itself, lean into it. The most important thing is to then go back and update your outline to match the new direction. This simple step keeps you from writing yourself into a corner and ensures all the new pieces fit together without creating plot holes down the road.
Can I Use These Methods for a Non-Fiction Book?
Absolutely. The underlying goal is the same—creating a logical, compelling structure—but your focus just shifts.
With non-fiction, you aren't outlining plot points; you're outlining arguments. Instead of building character arcs, you're guiding the reader through a flow of evidence and ideas.
Your outline will become the blueprint for taking your reader on a journey, ensuring each concept builds logically on the last. The chapter-by-chapter method works especially well here for constructing a persuasive and easy-to-follow manuscript. It's similar to how learning how to write a synopsis for book is all about understanding and arranging the core structural elements of the story.
Ready to turn your manuscript into a marketing powerhouse? ManuscriptReport.com generates a complete book marketing report in about 10 minutes, giving you everything from blurbs and keywords to ad copy and social media posts. Spend less time on marketing and more time writing your next masterpiece. Get your report at https://manuscriptreport.com.
Enjoyed this article? Subscribe for more + get a free marketing roadmap template.
Receive regular updates on marketing best-practices, AI shortcuts, and get our proven 4-phase marketing roadmap template for free.
Unsubscribe anytime.
Related Articles

8 Book Description Examples That Sell (2026)
Master 8 proven book description formulas with real examples. Learn Hook-Question-Stakes, Character-Journey-Transformation, and more techniques that convert browsers to buyers.
How to Write a Novel Summary: A Step-by-Step Guide
Learn how to write a novel summary that captivates readers. Discover expert tips on crafting compelling summaries that sell your story.

Master AI for Book Editing: Complete Guide
Master AI book editing with our complete guide for 2026. Discover top tools, step-by-step processes, and proven strategies to enhance your writing efficiently.